How To Add a Price Range Slider in Shopify (Free Code)
Learn how to add a price range slider in Shopify using code without installing a paid app. Follow this step-by-step guide to create a custom product filter, improve user experience, and help customers find products within their budget on your Shopify store.

In today’s e-commerce world, providing a seamless shopping experience is key to increasing sales. Shopify’s default filters are great, but sometimes you want a more interactive and visually appealing way for customers to filter products. In this tutorial, we’ll show you how to add a custom Price Range Slider Filter to your Shopify theme for free.
This custom slider allows your customers to drag and select their preferred price range, making your collection pages more user-friendly.
Please follow the step-by-step code changes below to implement this feature.
Step 1: custom-price-filter.liquid File Code
Go to the Snippets folder in your theme files.
Create a new file named custom-price-filter.liquid.
Paste your provided slider code into this file and Save it.
The complete Shopify Price Range Slider code can be downloaded below:
Download Price Range Slider Code
Step 2: settings_schema.json File Changes
Now we need to add the settings so you can control the colors and fonts directly from the Shopify Customizer.
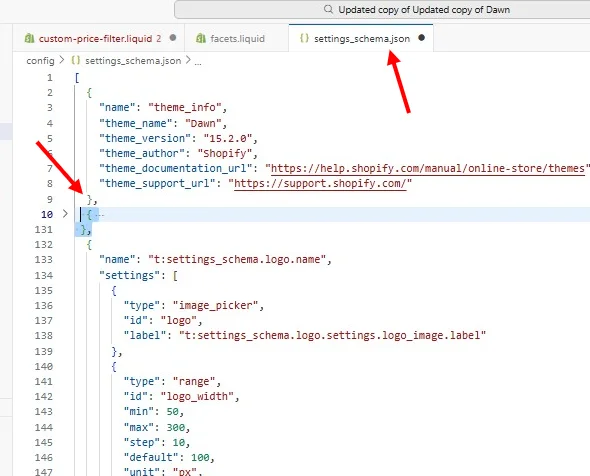
Step 1: Open the settings_schema.json file.
Step 2: Find the closing bracket }, after the “theme_info” section
Step 3: Paste the following code right after it:
Step 3: Render the Filter in filter.liquid
Now, we need to place the custom filter inside your theme’s filter file so it displays in the sidebar.
- In your theme code editor.
- Open the filter.liquid file.
- Search for the term: “price-filter”.
Look for the rendering block that looks like this:
{%- render ‘price-filter’, filter: filter, filter_style: block_settings.filter_style should_render_clear: should_render_clear, id_prefix: ‘horizontal’ -%}
Right below that line, paste the code to render your new custom slider:
{% render 'custom-price-filter' %}
Next, search for ‘filter-remove-buttons’ inside the same file. You will see a block of code that looks like this:
{% render 'filter-remove-buttons',
filters: filters,
results_url: results_url,
show_filter_label: block_settings.show_filter_label,
should_show_clear_all: false
%}
Cut this entire filter-remove-buttons block and paste it right under your new {% render ‘custom-price-filter’ %} code block.
- Click Save.
Step 4: Hide the Default Price Filter (CSS Fix)
To prevent the default Shopify price filter from conflicting with your beautiful new custom slider, we need to hide the old one using CSS.
- Go to the Assets folder in your theme files.
- Open the base.css file.
Scroll to the very bottom of the file and paste this code:
accordion-custom:has([data-testid="price-filter"]) {
    display: none !important;
}
Step 5: Final Steps in Theme Customizer
Go to Online Store > Themes > Customize.
Navigate to any Collection Page.
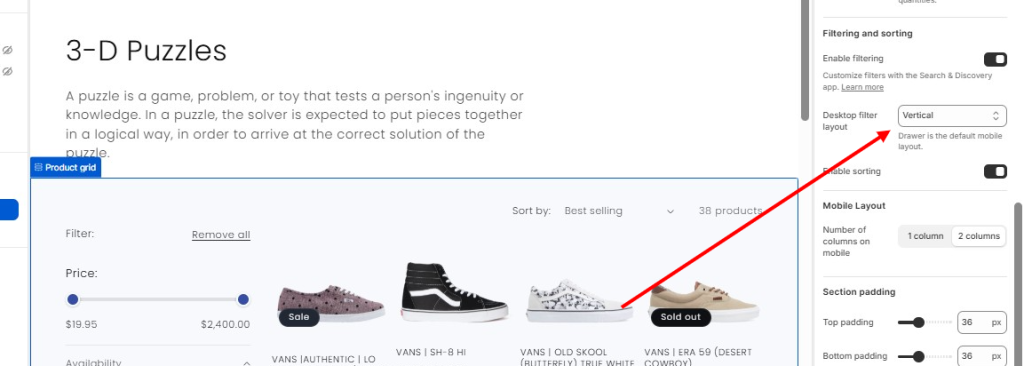
Click on Product Grid settings and ensure the Desktop filter layout is set to Vertical.
To customize the look, go to Theme Settings (gear icon) and find the Price-Filter tab. Here you can adjust the labels, font sizes, and colors to match your brand.
Was this article helpful?